I really need to rethink the purpose of this blog. In case you haven’t noticed, I’ve not been good about keeping it up to date. Honestly, I’ve slowly started disengaging with pretty much everything online. I don’t post about politics on Facebook anymore, and I’ve stopped talking smack on Twitter. I just… well.. have faded away.
But I need to do something creative. I’m just not sure what that is at the moment.
So I’ll post nothing here, for now. And maybe tomorrow, that nothing will be a little bit more. And maybe it’ll turn into something.
I’ve recently started using a MacBook Pro for work after years of working with Windows systems. Really, it’s not been that difficult of an adjustment; the most noticeable working adjustment has been shifting from using the CTRL key (Windows) to a COMMAND key (Mac). Copying and pasting code from StackOverflow was quite the adjustment.
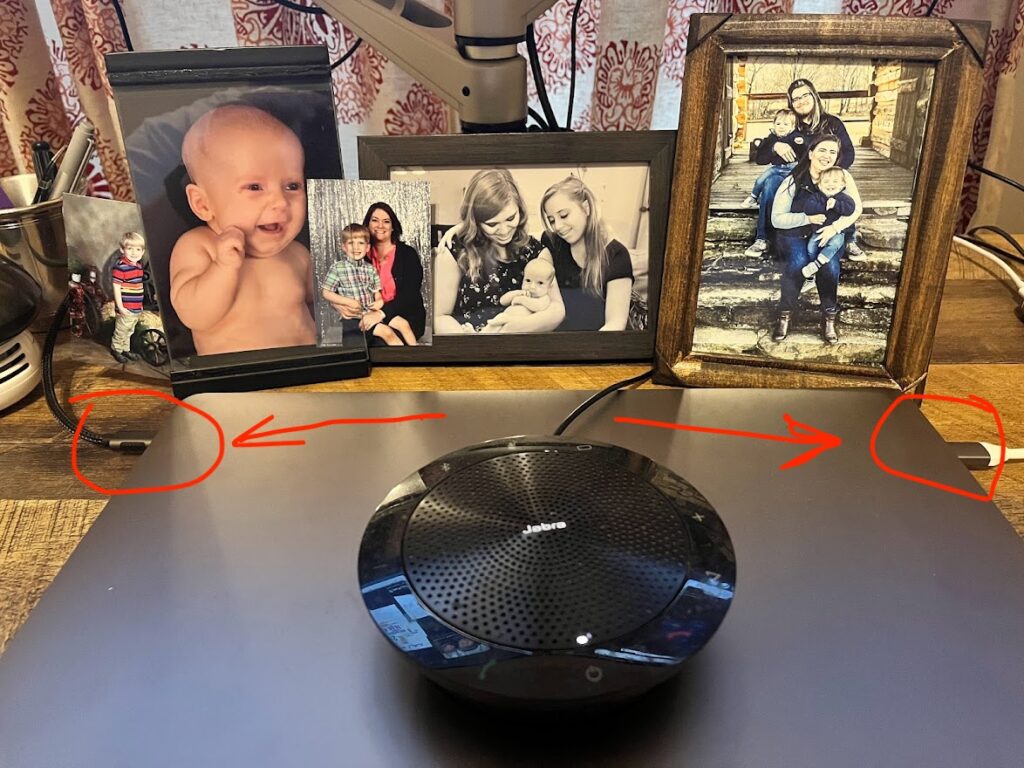
However, from a hardware perspective, the biggest struggle was just getting dual monitors running. My MacBook is an older model (2019) with 4 USB-C connectors (2 on each side). Finding a USB-C dock with dual HDMI outputs was easy, but I was shocked when I connected both of my monitors up, and had no option to extend to both monitors. In other words, both monitors showed the same information. If I left the laptop screen up, I could extend the desktop to the monitors, but the external monitors mirrored each other, even if the laptop showed a different screen. This is not the default behavior for Windows laptop docks; every monitor has the option to be handled separately.
After much digging and reading, I discovered the one option that worked for me; plugging a separate USB-C video connector into the ports on the other side of the MacBook. I have a USB-C dock on one side of my MacBook with an HDMI connector; to be on the safe side, I went with a USB-C to DisplayPort on the other side. Works like a charm, but it was pretty frustrating to figure that out. Blogging this to make it simpler for someone else.
Somewhere over the last year, I’ve let go of a good practice for working from home: commute time. We all need time to make the adjustment from life outside of work to work made and back. I used to take 30 minutes before work started to read a book, do some chores, exercise… anything BUT work. Likewise, at the end of the day, I’d try to wrap up work before my family got home.
I stopped doing that and have realized how long my workdays have become.
This morning, I started up again. This blog is part of my commute time. I’m also prepping my electric smoker for its first use.
Currently hanging out on a boy’s weekend with my 8 year old son (while my wife is out of town), and we’ve been spending some quality time watching a classic kids’ engineering show: Destroy, Build, Destroy! If you haven’t seen the show (and I’m pretty sure most of you haven’t given the limited two year run and subsequent horrible reviews), the premise is interesting. It’s a game show that pits two teams of teenagers against each other in an engineering challenge. The general set up is something like the following:
The teams are given an end goal, like build an air-cannon assault vehicle and shoot more targets than the other team in a time-limited window. They’re presented with resources (like an old SUV), which is then destroyed for parts.
Each team is then given time and additional resources to build their project. Halfway through the build, there’s another mini challenge (the setback) which allows for one team to sabotage the other.
Teams continue the build after the setback challenge, and then compete. The winner gets to destroy the losing team’s creation.
It’s a fun watch, and great for kids with both problem-solving and destructive mindset. For adults, there are some additional lessons that come to mind, particularly for those of us in the software industry. Below, in no particular order, are some of my observations and inspirations.
Start with end concept in mind. Concepts are functional, but aren’t perfect. The ultimate goal is to build something that achieves a a specific set of objectives (delivering value) within a certain time frame. Identifying the objective first, and then starting with a simple design, allows for flexibility based on whatever resources you have.
You’re not always going to have ideal resources. In the show, the teams are given the remnants of a previously successful project and a few additional resources; however, they’re always starting with less than ideal circumstances. Designs have to be a minimal viable product (MVP) in order for them to succeed in the competition.
Good communication skills can often compensate for technical limitations. They’re not a complete replacement, but teams that communicate well with each other can often work their way through technical challenges faster than teams that have strong technical skills but poor communication.
Small fixes often add up to big solutions. Usually on each team, there’s at least one person that is slow to contribute. Encouraging them to “do something… anything” often helped lead the team to victory. They may not have contributed as much to the build as other people did, but participating the whole time often gave them the opportunity to perform best when it really counted.
Setbacks happen. Sometimes they’re avoidable, but sometimes they’re not. Sometimes they give you the opportunity to rethink the MVP, and come up with alternative solutions. Sometimes they derail you completely. Figuring out how to handle a setback mentally is just as important as handling it technically.
Have fun. It’s a competition, and there’s money on the line for these kids. However, there’s something unabashedly FUN about both the creation and the destruction of engineering. No matter the outcome, enjoying the moment is a wonderful activity.
I’ve been struggling recently with feelings of burnout. I’m sure many of you are as well. The world is a scary place right now, and it’s been tough to find purpose and meaning in a my job (which was often the refuge for a scary world).
I don’t have any real advice. I don’t really know what to do, but I’m not giving up hope. The only piece of advice that has ever worked for me is to talk about the issues, and try to get one thing accomplished each day. So today? I’m writing a short blog, which is something I haven’t done for a while. After that, I’m canceling most of my meetings, and going to write some code.
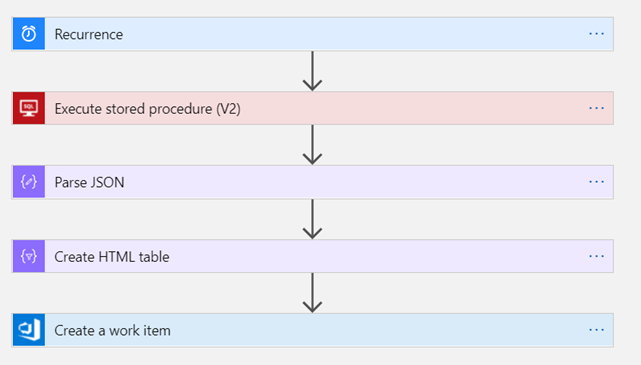
In a previous post, I described how to use an Azure Logic App to update an Azure DevOps work item; in an effort to add additional automation to our processes, I’m starting to move more and more notifications and work items directly to Azure DevOps using Logic apps. For example, for one of our websites, we have an SSRS report that queries the database to determine if employees are compliant with password policies. We get a weekly email that we then have to copy and paste into Azure DevOps (to track the work), and then we do the work. I want to eliminate the email step.
The workflow is very straightforward compared to updating an existing work item; there’s no need to manipulate a REST API for this. Connectors are all built in.
Set up a schedule using the Recurrence item.
Execute a stored procedure. This is the item that can be difficult to set up, especially if you have an on-premises SQL Server. In our case, I had to download and set up an on-premises data gateway, and then configure a connection to my SQL Server. Once that was done, I had to identify the database and stored procedure that contains the result set I wanted to add to the work item.
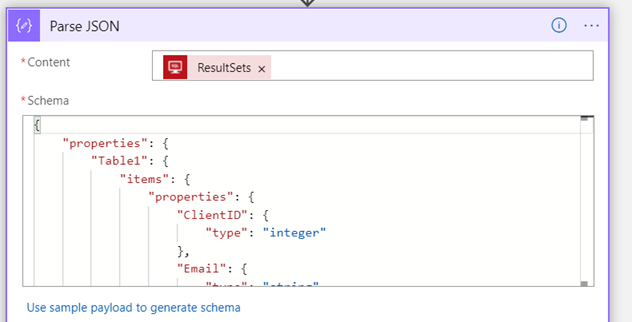
The result set from the stored procedure is in JSON format; parsing the JSON allows it to be defined as individual elements that can be referenced by additional actions.
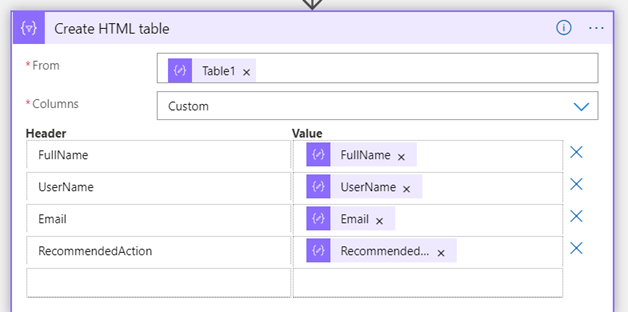
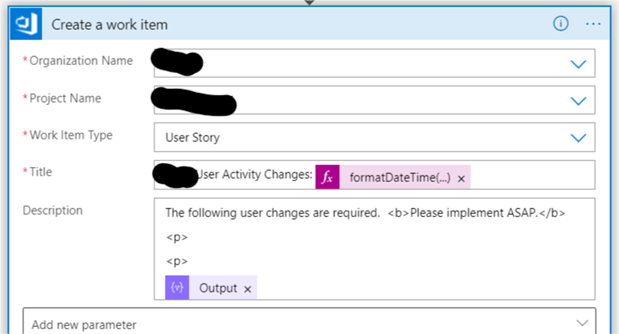
I then take those elements and focus on the items of interest to construct an HTML table.
I then create an Azure DevOps work item by adding the HTML table to the description field.
BONUS: I added a timestamp to the work item title by using the formatDateTime() function.
A big part of my job these days is looking for opportunities to improve workflow. Automation of software is great, but identifying areas to speed up human processes can be incredibly beneficial to value delivery to customers. Here’s the situation I recently figured out how to do:
My SRE team uses a different Azure DevOps project than our development team. This protects the “separation of duties” concept that auditors love, while still letting us transfer items back and forth.
The two projects are in the same organization.
The two projects use different templates, with different required fields.
Our workflow process requires two phases of triage for bugs in the wild: a technical phase (provided by my team), and a business prioritization (provided by our Business Analyst).
Moving a card between projects is simple, but there were several manual changes that had to be made:
Assigning to a Business Analyst (BA)
Changing the status to Proposed from Active
Changing the Iteration and Area
Moving the card.
To automate this, I decided to use Azure Logic Apps. There are probably other ways to approach this problem (like Powershell), but one of the benefits of the Logic Apps model is that it uses the same security settings as our Azure DevOps installation. It just simplifies some of the steps I must go through. The simplest solution I could implement was to move the work item when changing the Assigned To field to a Business Analyst. This allows us to work the card, add comments, notes, but when the time comes to hand over to our development team for prioritization, it’s a simple change to a key attribute and save.
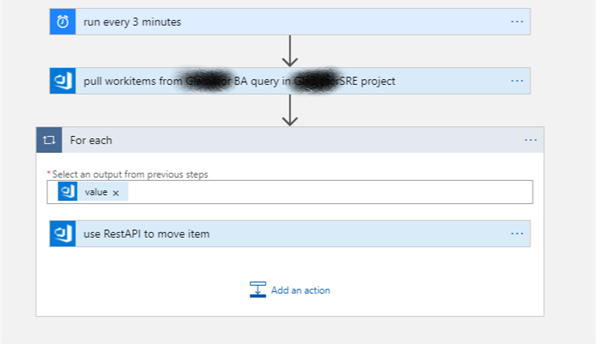
Here’s the Logic Apps workflow overview:
The initial trigger is a timer; every 3 minutes, the app runs and looks for work items that exist in a custom AzureDevOps query. This functionality is built into the Logic Apps designer as an Action for the Azure DevOps connector. The query exists in our SRE project, and simply identifies WorkItems that have been assigned to our Business Analyst Group. Note that the BA group is a team in the SRE project.
SELECT
    [System.Id]
FROM workitems
WHERE
    [System.TeamProject] = @project
    AND [System.WorkItemType] <> ''
    AND [System.State] <> ''
    AND [System.AssignedTo] IN GROUP '[SRE]\BA <id:56e7c8c7-b8ef-4db9-ad9c-055227a30a26>'
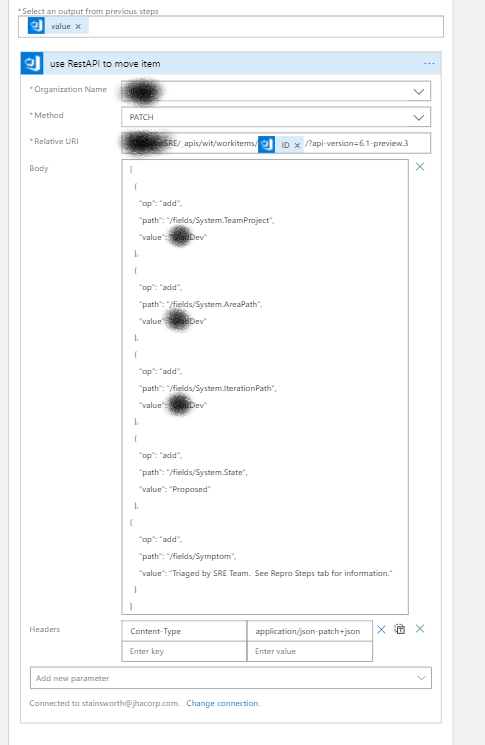
Once this query returns a list of work items to the LogicApp, I then use a For Each step in the designer, and embed a Rest API action.
The Rest API action offers maximum flexibility to update values for a work item; there is also an Update action, but the options were limited. There was once gotcha; you have to add the content-type, or it throws an error: application/json-patch+json
The code is below; it’s JSON, and the syntax is that you specify an operation (“add” for both updates and creates), a path to the field you want to change (path), and the value you want to set it to. In this case, I’m changing the Project, The Area Path, the Iteration Path, the State of the Work Item, and adding a comment to the Symptom field.
I used to love the Windows version of LiveWriter, and saw a tweet today to let me know that an open-sourced fork of it was available. This may restore my love of blogging; the interface is simple to use, and doesn’t feel as unfamiliar as the “blocks” used in WordPress these days.
The tool is a bit rough in places; I couldn’t get plugins to work, and pasting the above image from the clipboard also was challenging, but overall, it’s a welcome advance. Just feels natural to an old-school blogger like myself.
Lots of good ideas, but can’t seem to find the time to actually sit down and write about them. At the end of the year (2020), I had a major health scare; turned out to be ok, but it was significant enough to wake me up. I’d like to write about that someday.
I’d also like to describe my network setup. I’ve spent a lot of time working from home, and trying different approaches to staying connected. I’ve finally landed on a solution I like, and I need to spend some time diagramming it.
I should also blog about my job, and some of the challenges and fun stuff we do. I’ve recently started card games at lunch with my team, and I’m hoping that’s going to spur some new relationships. I’ve also started using a PIP tracking tool to help guide conversations with an employee who needs specific guidance (which is a weakness of mine).
So here’s the deal; consider this a blog post about blogging. My goal is to write one of these by the end of the week.
We’re starting a large scale conversion of our development processes with some very old database servers. Some of these databases were developed over 10 years ago, and they were never checked into source control. As our team develops new features, they’ve been using Red Gate’s SQL Change Automation to develop database projects along side their applications; it’s an impressive tool, and we’re getting ready to tackle older databases in an effort to improve our code base.
But, first, we need to determine what databases are already source control and which ones are not. Most of these databases and applications are minimally documented, so most of our development team doesn’t know what’s actually in production. To discover what databases are already part of SCA, I created a simple SQL script. It looks for the existence of the [dbo].[__MigrationLog] table, an artifact of the SCA process. I can then tell when a snapshot was last deployed, and what version was given.
CREATE TABLE #tmp (dbname varchar(1000), completedate Datetime, version varchar(200))

DECLARE @sql varchar (MAX)

SET @SQL = ' USE ?;
If exists (SELECT * from sys.tables t WHERE t.name = ''__MigrationLog'')
SELECT db_name() dbName, MAX(complete_dt) completeDate, MAX(version) version
FROM dbo.__MigrationLog
'

INSERT INTO #tmp
exec sp_msforeachdb @SQL

SELECT *
FROM #tmp

DROP TABLE #tmp