DevOps

#DASH2023: Three Things I Learned

Recently attended the 2023 DataDog DASH conference, and it was a lot of fun. This was the first in-person multi-day conference for me in a while (I did crash the PowerBI SQLSaturday Atlanta conference back in February, but attended no sessions and mostly just went to see friends). I had a blast; the conference space was amazing, and the content was thought-provoking. Here’s my key takeaways.:

Take your team to conferences.

I’ve been a manager for over 10 years now, and I’ve struggled to convince upper management to send multiple key individuals to conferences. Thankfully, my director at Grainger is a big believer in education, and not only did he encourage me to send a team, but he also wanted to come as well. It was awesome to have feedback on topics both upstream and downstream. I had team members with a variety of experiences (junior, mid, and senior), and they raised some insightful questions. We split up often, so I still managed to make some new networking contacts but it was good to come back together and discuss new ideas.

Your fires are no worse than anybody else’s fires.

Sometimes being on the production side of the development pipeline you get the feeling that the world is burning and there’s absolutely nothing you can do to save it. While we were at the conference, my slack channels were screaming about several ongoing issues that my team was having to deal with. At times, it’s overwhelming.

But talking to folks at the conference from companies in all types of verticals from health care to automotive to financial to manufacturing, we’re all dealing with the same issues. Changing enterprise systems is hard, and modern development methods often accelerate faster than production systems can respond. Additionally, systems that have been in place for years have often grown connections to other systems in unexpected ways; things break, and they break fast. Observability systems offer hope, but we shouldn’t feel like we’re the only ones struggling with implementing that vision.

AI, AI, AI,AI, AI, AI

Artificial Intelligence and Large Language Models are here. DataDog offers some compelling use cases to accelerate MTTx (Mean Time to Detect, Acknowledge, Respond, Repair, Resolve), but it will take some time to get the plumbing set up for it to provide value. Additionally, users have to be trained on how to do their jobs with a co-pilot. They have to trust the system, and know when to dive deeper than the initial responses. They have to know how to phrase questions in such a way to help the assistant understand them, and they have to understand what the assistant is suggesting. That’s going to take time.


Practical #kanban – map your flow to your work

When I started my new gig a little over a month ago, one of the first problems I wanted to tackle was the flow of work. My team does a lot, and some of the work is very structured and repetitive, whereas other work is much more fluid. It’s really two teams with different foci; they run different sync meetings, and had different work intake processes but they were sharing a board.

The board was a typical software-development style kanban board; board columns included things like:

  • Ready – User stories pulled out of backlog based on business priorities
  • In Progress – work that was ongoing
  • On Hold – work that was waiting for other team input
  • Validate – Work that needed sign-off from someone
  • Closed – recently “done” items

For a fluid SRE team where the project work can be ambiguous, a flow like this is OK (with some caveats that I’ll explain below); In Progress is a “squishy” state for work; you don’t know what the steps are, or how long it’s going to take at a glance. However, SRE work can be “squishy”; you don’t know if you’re going to be writing a script to automate a technical process or helping coordinate a large scale project to implement SLO’s for a new service. Having a card sitting In Progress is just a visual reminder of a task list.

For structured, repeatable work, though, this style of board has limitations; if the steps of being In Progress are known, then you can highlight obstacles in your process by teasing them out. The regulated work team doesn’t know how often projects come in, but when they do, they followed a series of steps for every project (no matter how much data was involved. There was also a lot of regular back-and-forth between this team and client teams early in the process; using the old board, cards were constantly moving back and forth between In Progress and On Hold. It made WIP limits on the board very difficult to track.

We spun up a new board to better represent the flow, focusing on replacing the concept of In Progress with more specific states tailored to the flow. We also identified the primary constraint(s) for each state, be it Client, Team Member, or Systems:

  • Ready: Projects (not single stories) pulled from the backlog in terms of priority (Client)
  • Requirements: A discussion phase with clients to finalize the expectations (Client\Team Member)
  • Prep: Project scripts are developed; data is gathered. (Team Member)
  • Produce: Actual work is in-flight (Systems)
  • Analysis: Write-up from project (Team Member)
  • Validate – Work that needed sign-off from someone (Client)
  • Closed – recently “done” items

Note that WIP can now be defined for multiple states (Prep, Produce, and Analysis); each of these states are governed by a limited number of resources; team members can only have 1 project in the Analysis state at a time, for example. Note also that the cards represent the entire project, not just a task inside a project. It’s an assembly line mentality, and allows us to quickly see where constraints are acting as a bottleneck.

With the regulated workflow removed from the original board, it let us focus on some rules for the fluid SRE work (the caveats referenced above). One of the basic decisions needed for a kanban flow is what does a card represent? For assembly lines, a unit of work could be the whole project, but for fluid software development efforts, it gets really soft.

We decided to go with a timebox method; a unit of work should take no more than a day of focused work. A card could be really small or reasonably large, but if you think a project will take more than a day, then split the work out. This has psychological advantages; it’s far better to see things getting marked as “done” than to just watch a card sit in the In Progress column for weeks.

Another rule we implemented was transferring ownership of the card in the Validate phases back to the original requester. We then started a clock; if a card sat in the Validate phase for more than 7 days, we flipped the ownership back to the team member, and closed the card.

So far, the team seems to be working well with the two new improvements; after 30 days, we should have enough data to see where we can continue to improve the flow.

For the ones who get it done…

Excited to announce that I’m starting a new position as the Senior Manager of Site Reliability Engineering for Grainger. It’s a fantastic opportunity; Grainger is nearly 100 years old, and yet their technology stack is very progressive.

I’m excited to contribute and yet still learn new things every day.

Trello Power-Ups and Automation

As I posted last time, I’ve been using Trello as a Kanban board to help with my job search. The default functionality for Trello is effective, but there are some free components you can add to minimize the time managing the workflow (so you can focus on the work itself). In Trello, these are broken up into two broad classes:

  • Power-Ups: add-ins that have been developed either by Atlassian or contributors, and
  • Automation: native functionality to Trello that are triggered by actions or dates.

Power-Ups

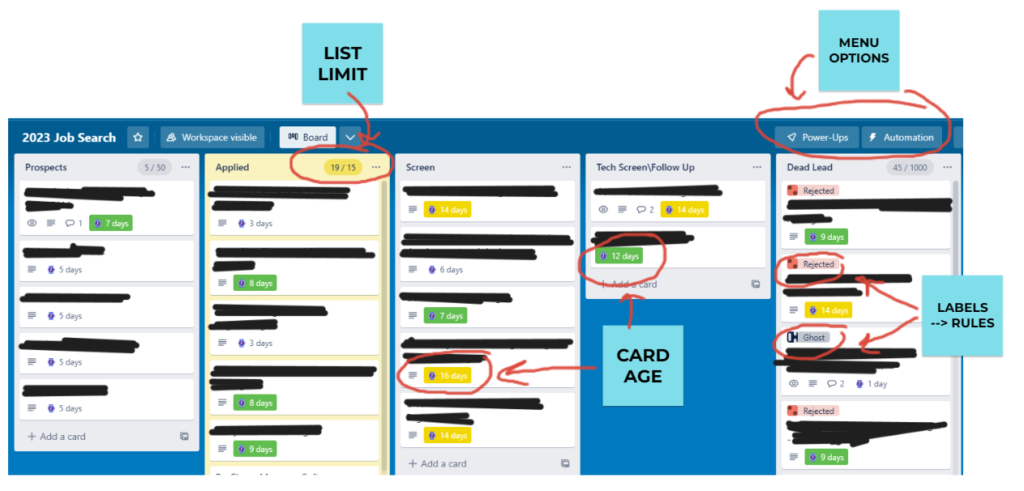
Adding a Power-Up to an existing board is easy; just push the menu button near the top right of the board and click on the add power-ups button. As you can see in the screenshot, I have two power-ups that I use in my job search board.

Card Age Badge – this puts a colored icon on each card that shows how old that card is. This allows me to track individual job submissions or leads and follow-up on older cards. At this point, I’m mostly using it to indicate when a job has “ghosted” me, and I no longer consider them active applications.

List Limits – an important component of kanban is WIP, and Trello does not capture that by default. This Power-Up lets you set a limit per column (and tracks the number of work items in each column). I use it as Reverse WIP measurement; I want to keep at least 15 applications in progress. List Limits will color the background of a column when you exceed the limit, so for my Applied column I set a limit of 15, and as long as the background is colored, I can focus on other things.

Automation

To access automation, click the Automation menu item next to the Power-Ups button. Because my needs are simple, I only use the Rules feature for my setup. Trello’s implementation of rules is very nice in that it creates natural language statements to show what is to be done and when. I have the following rules:

when a comment is posted to a card by me, move the card to the top of the list

when the red "Rejected" label is added to a card by me, move the card to the top of list "Dead Lead"

when the dark black "Ghost" label is added to a card by me, move the card to the top of list "Dead Lead"
The interface is very easy to set up; each rule is simply a trigger (something that happens) and an action (something that gets done). The three rules above do two things; they allow me to move a card to the top of the stack by simply adding a comment to the card (this helps me to remember to follow up on it), and to move a card to the Dead Lead list when I either get rejected or I think the posting has ghosted me (no response after 14 days).

Board Final* View

Here’s what my board looks like today; as always, there’s room for improvement, but this allows me to focus on the job of finding a job while minimizing the overhead of managing the job search.

Good luck out there! And as always, if you want to see what kinds of roles I’m interested in, check out my LinkedIn profile! Stuart Ainsworth | LinkedIn

Code Complete

19 years, 3 months.

My last day at Jack Henry and Associates will be February 4, 2022. I am extremely grateful for the opportunities I’ve had. Jack Henry has been very supportive of working from home for the last 14 years, and they’ve fostered me as a learning-center manager. The work-life balance and benefits were extremely tough to beat over the last 19 years. I’ve built and supported some really cool things in the managed security services space. I’ve grown up here.

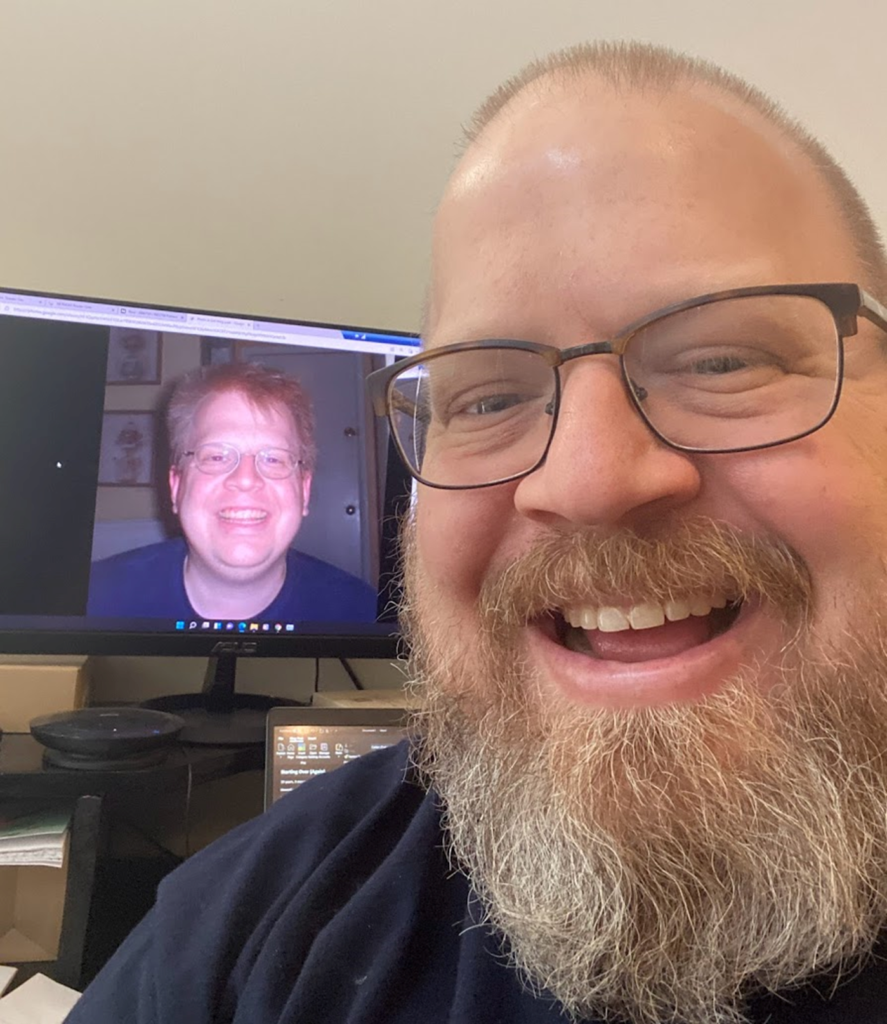
Here’s a selfie (now) next to a photo of me from 2002 (when I joined JHA).

I’m a dinosaur by IT career standards; honestly, I didn’t think I’d write this blog post anytime soon. However, COVID-19 has changed the way we work, and more companies are creating remote leadership positions.

On February 7th, 2022, I’ll start a new position at Salesforce, working as a Senior Manager of Systems Engineering, supporting the CI/CD infrastructure for Tableau. I’m ecstatic about the opportunity, but I will greatly miss all of my colleagues from JHA (Gladiator), particularly my direct reports.

I still plan on blogging intermittently, and I’ll be active and involved in the community (in fact Salesforce actively encourages volunteerism), so I’m not going anywhere. But yet, I’m moving up, and am looking forward to figuring out the next few challenges in my career.

Let’s build something awesome.

Destroy, Build, Destroy! #DevOps lessons

Currently hanging out on a boy’s weekend with my 8 year old son (while my wife is out of town), and we’ve been spending some quality time watching a classic kids’ engineering show: Destroy, Build, Destroy! If you haven’t seen the show (and I’m pretty sure most of you haven’t given the limited two year run and subsequent horrible reviews), the premise is interesting. It’s a game show that pits two teams of teenagers against each other in an engineering challenge. The general set up is something like the following:

  1. The teams are given an end goal, like build an air-cannon assault vehicle and shoot more targets than the other team in a time-limited window. They’re presented with resources (like an old SUV), which is then destroyed for parts.
  2. Each team is then given time and additional resources to build their project. Halfway through the build, there’s another mini challenge (the setback) which allows for one team to sabotage the other.
  3. Teams continue the build after the setback challenge, and then compete. The winner gets to destroy the losing team’s creation.

It’s a fun watch, and great for kids with both problem-solving and destructive mindset. For adults, there are some additional lessons that come to mind, particularly for those of us in the software industry. Below, in no particular order, are some of my observations and inspirations.

Start with end concept in mind. Concepts are functional, but aren’t perfect. The ultimate goal is to build something that achieves a a specific set of objectives (delivering value) within a certain time frame. Identifying the objective first, and then starting with a simple design, allows for flexibility based on whatever resources you have.

You’re not always going to have ideal resources. In the show, the teams are given the remnants of a previously successful project and a few additional resources; however, they’re always starting with less than ideal circumstances. Designs have to be a minimal viable product (MVP) in order for them to succeed in the competition.

Good communication skills can often compensate for technical limitations. They’re not a complete replacement, but teams that communicate well with each other can often work their way through technical challenges faster than teams that have strong technical skills but poor communication.

Small fixes often add up to big solutions. Usually on each team, there’s at least one person that is slow to contribute. Encouraging them to “do something… anything” often helped lead the team to victory. They may not have contributed as much to the build as other people did, but participating the whole time often gave them the opportunity to perform best when it really counted.

Setbacks happen. Sometimes they’re avoidable, but sometimes they’re not. Sometimes they give you the opportunity to rethink the MVP, and come up with alternative solutions. Sometimes they derail you completely. Figuring out how to handle a setback mentally is just as important as handling it technically.

Have fun. It’s a competition, and there’s money on the line for these kids. However, there’s something unabashedly FUN about both the creation and the destruction of engineering. No matter the outcome, enjoying the moment is a wonderful activity.

You can watch the show on YouTube; hope you enjoy this lost classic. https://youtu.be/77atHNtNcwY

Using an #Azure Logic App to move @AzureDevOps Work Items

A big part of my job these days is looking for opportunities to improve workflow. Automation of software is great, but identifying areas to speed up human processes can be incredibly beneficial to value delivery to customers. Here’s the situation I recently figured out how to do:

  1. My SRE team uses a different Azure DevOps project than our development team. This protects the “separation of duties” concept that auditors love, while still letting us transfer items back and forth.
  2. The two projects are in the same organization.
  3. The two projects use different templates, with different required fields.
  4. Our workflow process requires two phases of triage for bugs in the wild: a technical phase (provided by my team), and a business prioritization (provided by our Business Analyst).
  5. Moving a card between projects is simple, but there were several manual changes that had to be made:
    1. Assigning to a Business Analyst (BA)
    2. Changing the status to Proposed from Active
    3. Changing the Iteration and Area
    4. Moving the card.

To automate this, I decided to use Azure Logic Apps. There are probably other ways to approach this problem (like Powershell), but one of the benefits of the Logic Apps model is that it uses the same security settings as our Azure DevOps installation. It just simplifies some of the steps I must go through. The simplest solution I could implement was to move the work item when changing the Assigned To field to a Business Analyst. This allows us to work the card, add comments, notes, but when the time comes to hand over to our development team for prioritization, it’s a simple change to a key attribute and save.

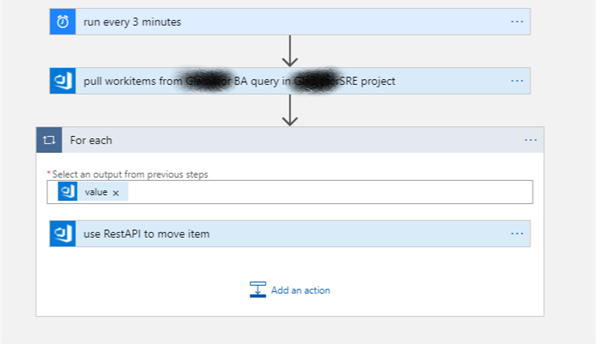
Here’s the Logic Apps workflow overview:

The initial trigger is a timer; every 3 minutes, the app runs and looks for work items that exist in a custom AzureDevOps query. This functionality is built into the Logic Apps designer as an Action for the Azure DevOps connector. The query exists in our SRE project, and simply identifies WorkItems that have been assigned to our Business Analyst Group. Note that the BA group is a team in the SRE project.

SELECT
    [System.Id]
FROM workitems
WHERE
    [System.TeamProject] = @project
    AND [System.WorkItemType] <> ''
    AND [System.State] <> ''
    AND [System.AssignedTo] IN GROUP '[SRE]\BA <id:56e7c8c7-b8ef-4db9-ad9c-055227a30a26>'

Once this query returns a list of work items to the LogicApp, I then use a For Each step in the designer, and embed a Rest API action.

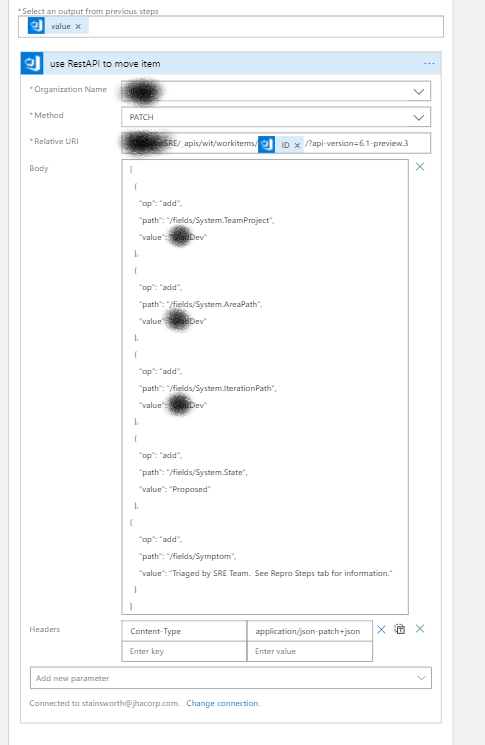
The Rest API action offers maximum flexibility to update values for a work item; there is also an Update action, but the options were limited. There was once gotcha; you have to add the content-type, or it throws an error: application/json-patch+json

The code is below; it’s JSON, and the syntax is that you specify an operation (“add” for both updates and creates), a path to the field you want to change (path), and the value you want to set it to. In this case, I’m changing the Project, The Area Path, the Iteration Path, the State of the Work Item, and adding a comment to the Symptom field.

[
  {
    "op": "add",
    "path": "/fields/System.TeamProject",
    "value": "Dev"
  },
  {
    "op": "add",
    "path": "/fields/System.AreaPath",
    "value": "Dev"
  },
  {
    "op": "add",
    "path": "/fields/System.IterationPath",
    "value": "Dev"
  },
  {
    "op": "add",
    "path": "/fields/System.State",
    "value": "Proposed"
  },
{ 
    "op": "add",
    "path": "/fields/Symptom",
    "value": "Triaged by SRE Team.  See Repro Steps tab for information."
  }
]

Sending monthly scheduled email from an Azure DevOps query

One of my tasks over the last few years is to keep management and senior management aware of software deployments for our hosted services. This started out as a CAB (Change Advisory Board), but all of our deployments quickly became standard, and it basically became a monthly review of what had happened (which is not what a CAB meeting is supposed to be). I figured a meeting wasn’t necessary, so I was looking for a way to show what we’ve done in an easy to digest method.

The problem is that Azure DevOps doesn’t offer a scheduled email functionality out of the box. There is a Marketplace scheduler that you can use as part of a build, but unfortunately, t didn’t work in our environment for some reason. I stumbled on the concept of Power Automate, but Azure DevOps is a premium connector. However, we do have an Azure subscription, so Logic Apps it is.

Below is the flow that I came up with. At first it seemed relatively straightforward to pull together, but the stumbling block was the fact that the HTML tables are VERY rudimentary. No styling, no hyperlinks, nothing. That’s the reason for the additional variable steps.

The initialize variable state is where I define a string variable to handle the output of the Create HTML Table step. It’s empty, until I set it later (in the Set Variable) step. The Create HTML table was mostly easy, except that I wanted a defined border, and a hyperlink that would allow recipients to click on the link and get to the specific work item.

[ba]https://your_org_here/your_project_here/_queries/edit/{{ID}}[ea]{{ID}}[ca]

The set variable then takes the output of the Create HTML table step, and replaces the placeholders with appropriate HTML tags. In this case, I added a table border, and made a hyperlink out of the ID column.

replace(replace(replace(replace(body('Create_HTML_table'), '<table>', '<table border=10>'), '[ba]', '<a href="'), '[ea]', '">'),'[ca]','</a>')

The email step then uses this variable in the body, and the final product looks something like this:

Been a weird year….

And you’re probably going to see a ton of retrospective posts going live soon from a variety of authors. I’m struggling to write… well, anything…. That being said, I’ve had a few key successes over the last year.

  1. Presented several times virtually, particularly as a Friend of Red Gate. DevOps Enterprise Summit, PASS Summit, and DPS. I also presented for Georgia DAMA and for the Nashville SQL Saturday (my last in-person presentation).
  2. Job is good; learning lots of new stuff with Powershell and OCtopus Deploy, as well as Azure DevOps.
  3. We got an awesome dog. Meet Conway.

Of course, lots of other stuff happened too. COVID decimated travel plans, and as most of you are aware, it killed an organization that I’ve been a long-time member of (PASS). It also cancelled the SQLSaturday Atlanta for 2020, perhaps indefinitely.

Top it off with some health stuff, and frankly, I’m exhausted. However, I do have this urge to make the most out of the next year, and the only way I know how to do that, is to get back in the habit of writing.

More to come.